Computer Repair
- Clear Cookies and Cache
- How to check for computer updates
- ScreenConnect Remote Support
- Personal Computer Repair
- View PDFs in Chrome Web Browser
Clear Cookies and Cache
Overview
These instructions are for clearing your Cookies and Cache from your web browser. Clearing your cookies and cached data can do several things, including remove old files your browser no longer needs, log out of applications using SSO (Single Sign-On) that keep you automatically logged in, and can resolve some issues with browsers or online applications not working correctly.
Getting Started
NOTE: Please note that clearing all cookies and cached data will remove your saved usernames and passwords from your web browser, and you will need to manually log back into websites. You may edit the time as needed to select the amount of time you want to delete cookies and site data from.
Microsoft Edge
- Open Microsoft Edge.
- Click on the three-dot menu (ellipsis) in the upper-right corner and select Settings.
- In the left-hand menu, click on Privacy, search, and services.
- Scroll down to the Clear browsing data section and click Choose what to clear.
- In the pop-up window, ensure Cookies and other site data and Cached images and files are selected.
- Select the time range as All time.
- Click Clear now.
- Close and reopen your browser.
Google Chrome
- Open Google Chrome.
- Click the three-dot menu in the upper-right corner and select Settings.
- In the left-hand menu, click Privacy and security.
- Click on Clear browsing data.
- In the pop-up, ensure Cookies and other site data and Cached images and files are checked.
- Set the time range to All time.
- Click Clear data.
- Close and reopen your browser.
Mozilla Firefox
- Open Mozilla Firefox.
- Click on the three horizontal lines (menu) in the upper-right corner and select Settings.
- Click on Privacy & Security in the left sidebar.
- Under Cookies and Site Data, click Clear Data.
- In the pop-up, ensure both Cookies and Site Data and Cached Web Content are selected.
- Click Clear.
- Close and reopen your browser.
Safari (Mac)
- Open Safari.
- In the menu bar, click Safari > Preferences.
- Click the Privacy tab, then click on Manage Website Data.
- Select Remove All to delete all cookies and data.
- In the menu bar at the top of the screen, click Safari.
- From the drop-down menu, select Quit Safari.
- Optionally to close Safari, you may press Cmd + Q.
How to check for computer updates
Overview
This article covers checking your Windows 11 or MacOS device for updates.
Getting Started
Keeping Windows or macOS updated ensures better security, performance, and compatibility with the latest software and features.
Windows 11
Install Windows Updates - Microsoft Support
MacOS
Update macOS on Mac - Apple Support
ScreenConnect Remote Support
Overview
ConnectWise ScreenConnect is a remote support and access tool that allows technicians to connect to your computer to assist you with connecting to or utilizing our services.
Personal Computer Repair
McLennan Community College Help Desk only able to assist with issues connecting to or utilizing our services. We are unable to provide support for the device itself, such as with hardware or operating system issues. You can find more information and support options at Personal Computer Repair.
Getting Started
Sessions are initiated solely by a MCC technical support representative and are not active at all times.
Connect to a Session – Windows
- Go to: ScreenConnect.
- Enter the code provided by the MCC technician and then click the blue arrow.
- Open/run/install the ScreenConnect.Client.exe file that downloads.
Connect to a Session – MacOS
- Go to: ScreenConnect.
- Enter the code provided by the MCC technician and then click the blue arrow.
- On the 'Join Session' screen click Download App or Launch App.
a. 'Download App' if you do not already have it installed.
b. 'Launch App' if you already have the app installed from a previous session. - If the site asks you to allow downloads on "mccsupport.screenconnect.com" click 'Allow'
- Once the download completes, open the ScreenConnect Client file.
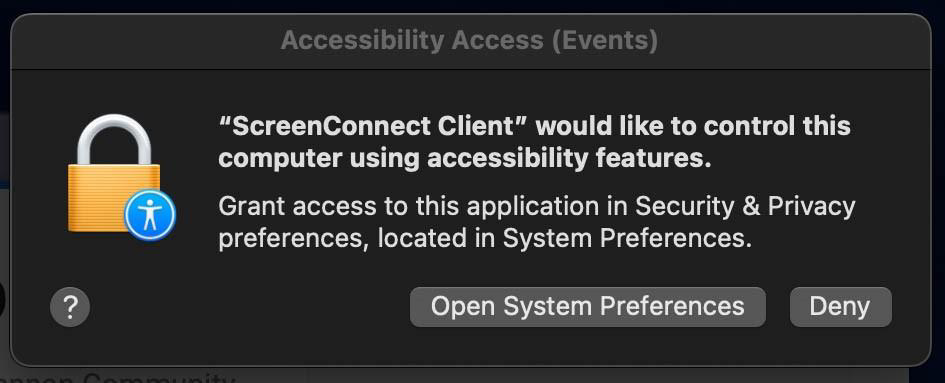
- Some systems require the granting of Accessibility AND Screen Recording access to enable screen sharing. If after opening the file you receive a prompt to 'Open System Preferences', you will need to follow the steps
below before your screen will be visible. Note: These images may differ from your MacOS version.- Click 'Open System Preferences' OR click the Apple icon at the top left and select 'System Preferences…' > 'Security & Privacy'.

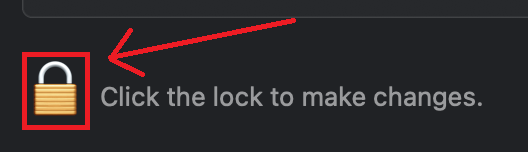
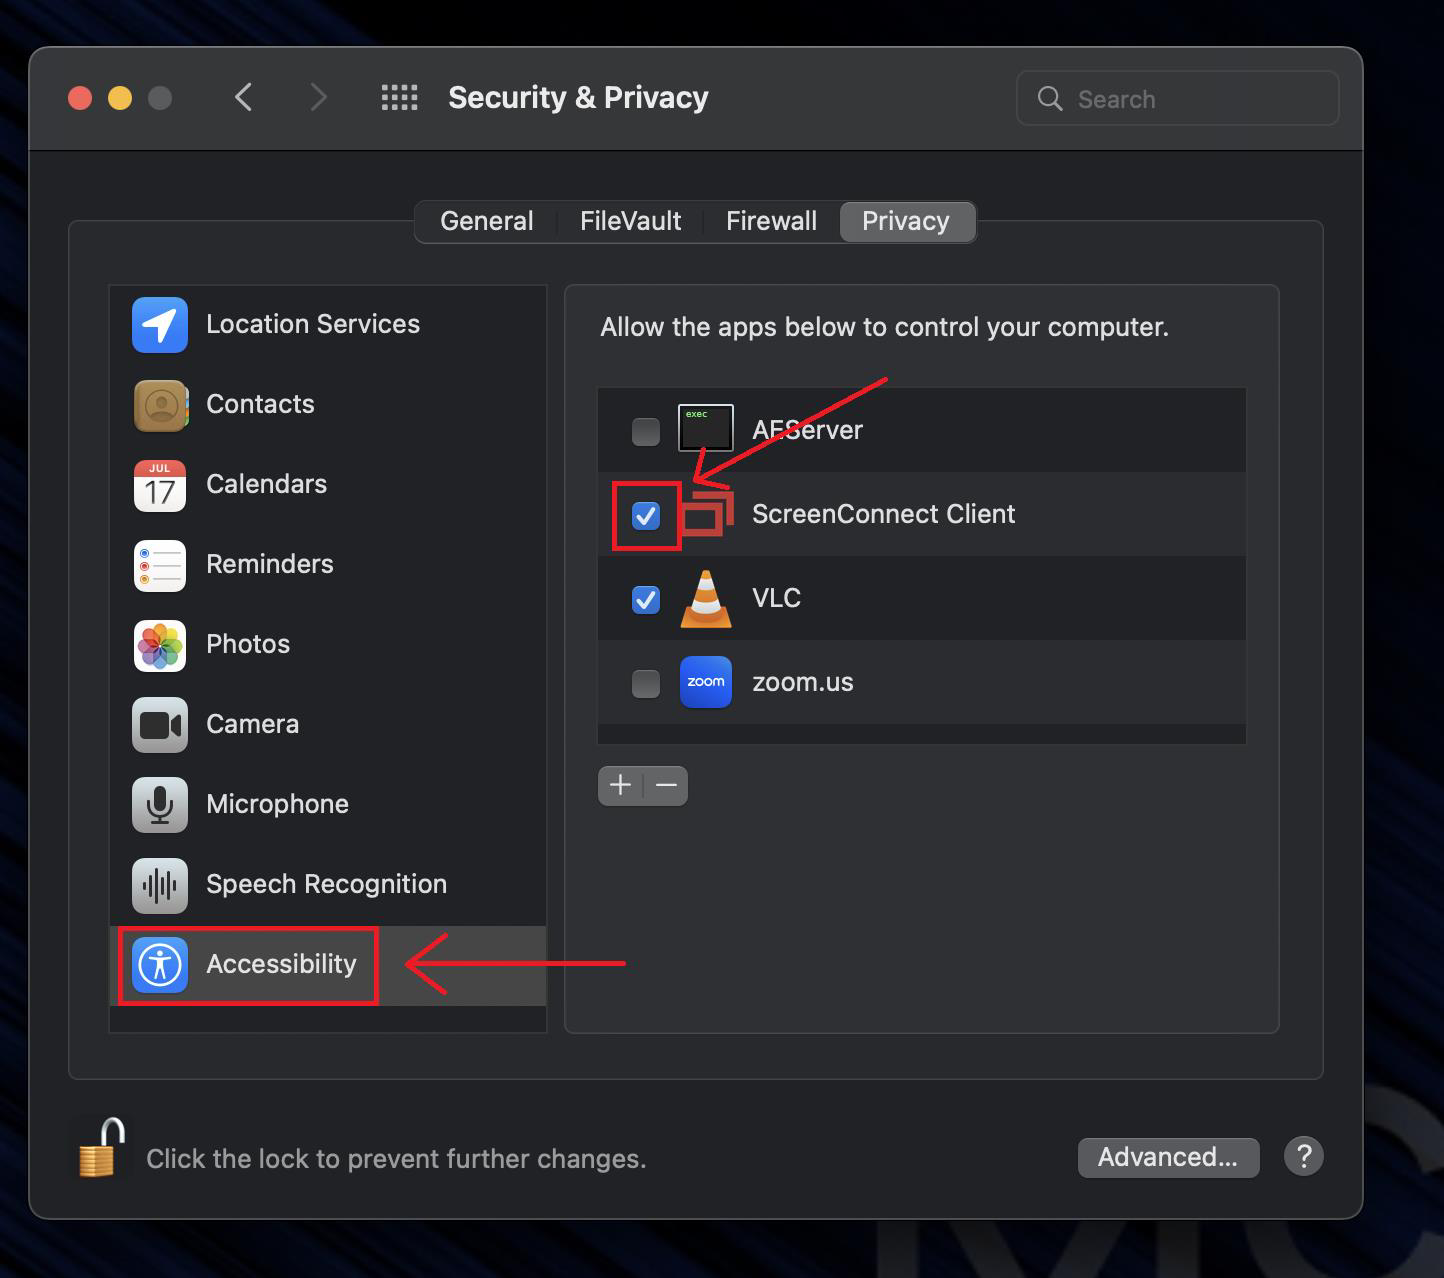
- Select the Privacy tab at the top and then the Accessibility on the left-hand menu. Click the lock icon to make changes and when prompted, enter the credentials used to sign onto the Mac.

- Check the box next to ScreenConnect Client. If prompted to 'Quit & Reopen' ScreenConnect Client to apply the changes go ahead and do so.

- Select Screen Recording on the left-hand menu and repeat the process to grant permission to ScreenConnect.
- Once both settings have been applied, click the lock icon to return it to the locked position.
- Click 'Open System Preferences' OR click the Apple icon at the top left and select 'System Preferences…' > 'Security & Privacy'.
Start a ScreenConnect Session – Android/ChromeOS/iOS
Note: Other than on Samsung smartphones, devices will be in View Only mode.
- Go to your device's app store and install: ConnectWise Control by ConnectWise
Note: After installation, the app shortcut may be named: ScreenConnect
Note: ChromeOS – App is only available in the Google Play Store. It is not available in the Chrome Web Store. For a device managed by your school/organization, ask your Google administrator to allow the Play Store on your device or sign in with your personal Gmail account. - Once installed, open the app.
a. For Chromebooks, click the device type option at the top and select 'Tablet' - If it asks for the 'ScreenConnect URL', enter mccsupport.screenconnect.com and click 'GO' (on subsequent uses it will skip this step and be on the code screen)
- On the 'Join with a code' screen, enter the 5-digit code from provided by the MCC technician and click the arrow to the right to join the session
- a. Android/iOS: Accept any app/permission requests
b. On ChromeOS: Select the screen thumbnail and then click 'Share' to share your device's screen
Note: It may take up to a couple of minutes for the initial screen display on ChromeOS. If it does not display for the technician, exit the app and retry.
Personal Computer Repair
Overview
McLennan Community College is only able to assist with issues connecting to or utilizing our services. We are unable to provide support for the device itself, such as with hardware or operating system issues.
Getting Started
- If your device is under warranty, we recommend contacting the manufacturer's warranty department to determine if that type of repair would be covered. Most warranties will cover hardware issues for one year, but it is possible to have additional coverage and/or for longer periods.
- If your device is no longer under warranty or the repair would not be covered, we recommend contacting a local computer repair shop to assist you. Performing a Google search for "computer repair [insert city name, TX]" can help you locate nearby businesses and read recent reviews regarding their service quality.
View PDFs in Chrome Web Browser
Overview
Google Chrome settings can allow PDF downloads or open in the browser.
Getting Started
When Google Chrome is set to only download PDFs you may see the following error message when a webpage tries to show a PDF in the browser: "If you are unable to view file, you can download from here or download Adobe PDF reader to view the file".
Set Chrome to Show PDFs
To enable Chrome's built-in PDF viewer, allowing you to view PDF files directly in the browser without downloading them, follow these instructions.
- Open Google Chrome on your computer.
- Click on the three vertical dots (⋮) in the top-right corner of the browser window.
- Select "Settings" from the dropdown menu.
- Select "Privacy and security" in the left-hand menu.
- Select "Site settings".
- Scroll down and Select "Additional content settings".
- Select "PDF documents".
- Select the option to "Open PDFs in Chrome".